

This document presumes you know several things:
- The domain or workgroup of the share you are connecting to
- The hostname or IP address of the share you are connecting to
- The username
- The password
- The share name
Step 1.
Switch to the Finder by clicking on the stylized face at the far left of your Dock.Step 2.
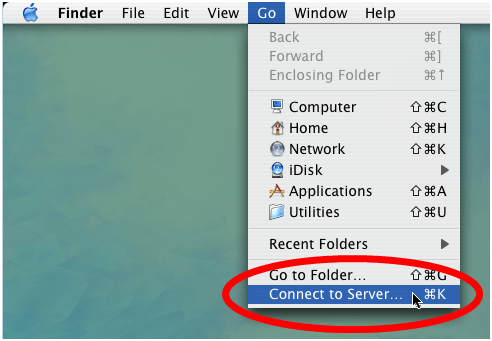
Click on Go and then click on “Connect to Server…”
Step 3.
Type in smb://. Then type in the hostname, followed by a forward slash(/), then type the share name.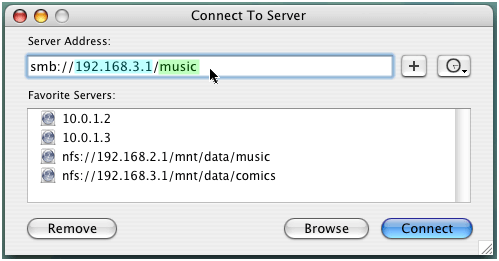 In this example, the host name is “192.168.3.1”, highlighted in blue. The share name is “music”, highlighted in green.
 Step 4.
Click “Connect”. The computer will bring up a box with a barber-pole while it tries to connect to the server.Step 5.
Type in your workgroup or your domain(you will have only one), your username, and your password. The password will appear as a series of dots as you type it in. This is to prevent “shoulder-surfing”, where someone looks over your shoulder as you type in the password and then knows your password because they read it.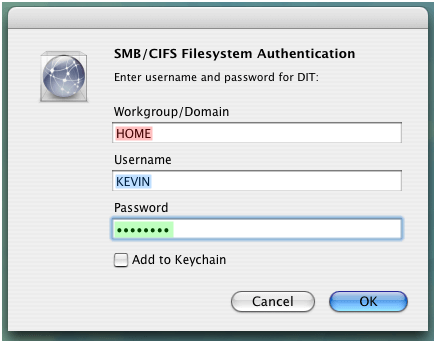 In this example, the workgroup or domain is “HOME”, highlighted in red. The username is “KEVIN”, highlighted in blue. The password is highlighted in green, shown here as a series of dots.
 Step 6.
Click “OK”Step 7.
Assuming everything went correctly, you should now be connected to the remote server and able to access files.Troubleshooting
Sometimes things don’t go perfectly. This section will give several common errors and how to fix them.Invalid hostname
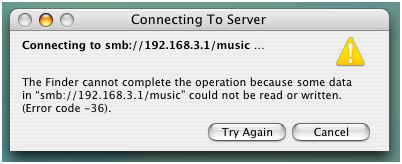 If you get this error after clicking on “Connect” in step 4, then you have probably entered the incorrect hostname or IP address. Go back to step 3 by clicking on “Cancel” (repeat step 2 if necessary) and enter the hostname (in blue) correctly. If you have, then you may need to talk to your friendly system administrator and see if they can do anything about it.
 Invalid share name
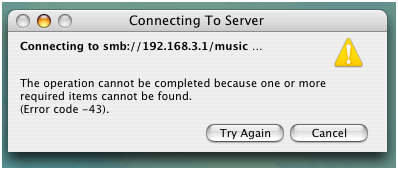 If you get this error after clicking on “Connect” in step 4, then you have probably entered the incorrect share name. Go back to step 3 by clicking on “Cancel” (repeat step 2 if necessary) and enter the share name (in green) correctly. If you have, then you may need to talk to your friendly system administrator and see if they can do anything about it.
 Invalid username or password
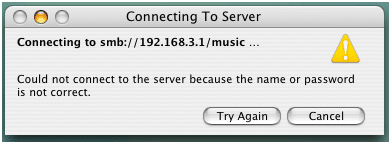 If you get this error after clicking on “OK” in step 6, then you have probably entered an incorrect username or an incorrect password. There will never be any way to tell which one it is. Click on “Cancel”, then repeat step 5 (repeat step 2 if necessary) and make sure that you have entered the username and workgroup or domain correctly. If you have, then re-type the password. Again, it will show only as a series of dots to prevent “shoulder-surfing”. If this does not work, then you may need to talk to your friendly system administrator and see if they can do anything about it.